Learning to use Adobe Connect
http://help.d2l.arizona.edu/node/669
Quick Facts:
- Rooms are limited to 100 people. If you need more, see Adam
- Rooms support up to 20 breakout groups
- The maximum size of a file uploaded to Connect is just under 100MB.
- You can upload the meeting’s files before the meeting and when you quit and return to the meeting, the files will still be there. This is important to remember as these files will still be around for subsequent meetings.
Key differences between Adobe Connect and Blackboard Collaborate
Modules versus Pods:
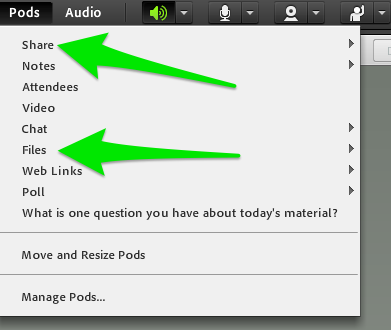
Elluminate uses the term Module for the individual parts of the screen [Participants, Chat, Presentation]. Connect uses the term Pod for these components. It also has many more options that were not available in Elluminate. A list of Pods is below.
Meeting resources persist from one meeting to another.
The arrangement of the Modules (Pods) can be set up ahead of time and changed during the meeting.
My browser says that flash is blocked for this website. How do I unblock it?
- For Internet Explorer, see Enabling Flash Player | Internet Explorer.
- For FireFox on any OS, see Enabling Flash Player | Firefox.
- For Safari on Mac OS, see Enabling Flash Player | Safari.
- For Google Chrome, see Enabling Flash Player | Chrome.
- For Opera, see Enabling Flash Player | Opera.
What are the top Adobe Connect vocabulary words:
Pods: A pod is a window in the online meeting with a specific capability such as chat or share.
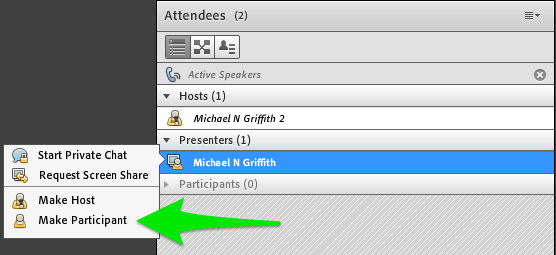
Participants, Presenters, and Hosts: The participant role is the default for students and guests enter your room. Participants can use the Chat pod and answer polls but can not share a file or presentation (by default). Presenters can upload files (ppt, images, mp4 movies) to the sharing pod and have access to the Presenter Only area should it be used. They can’t affect the layout of the meeting. Hosts have full control over the meeting including allowing guests into the room and opening and closing new Pods and Layouts. There will typically be only one host in the room (you - by virtue of setting up the meeting in D2L) but you may promote students to presenter who will be sharing a presentation or a whiteboard with the class. You can then make them a participant again when they are done.
Layout: Layouts are the mechanism for collecting different pods you want to use during your course or meeting. You might have a Lobby layout that has the Video pod for your webcam, the Chat Pod so that participants can chat with each other, and a Sharing Pod showing the title of the talk. A Exit Ticket layout may consist of one or more Polling Pods with questions you want participants to answer before leaving the meeting. You use Layouts to transition from one kind of activity to another.
How do I upload stuff?
There are two pods that allow you to upload files in Adobe Connect. The Sharing Pod allows you to upload files that you want to display to your participants. The Files Pod is for files that you want to offer as a download.
How do I upload a PPT file?
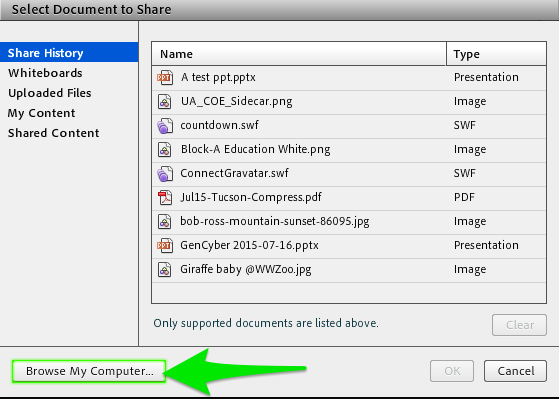
From a Sharing Pod, select Share Document. This will open a window that offers documents that you have already uploaded and the ability to browse your computer for new files. Select Browse My Computer to select a new file.
How do I upload a second PPT file?
Two options here. Either stop sharing the current PPT and repeat the steps for uploading a PPT or create a second Sharing Pod and put your second PPT in that pod and arrange your layout to let you jump from one to the other.
How do I upload a Word document?
Adobe Connect doesn't directly support Word documents from the Sharing pod. You can export your Word document as a PDF and share that via the Sharing pod or you can upload the Word document to the File pod and students can download it and follow along on their own computers.
How do I post a URL?
The easiest way to post a URL is to add it to the Chat Pod. If you want an ongoing list of URLs that you have used in the course, the Web Links Pod is the way to go. Additionally, you can force open the URL added to the Web Links Pod on all participant screens.
How do I do a quiz / poll?
Adobe Connect supports Multiple Choice, Multiple Answer, and Short Answer questions in the Poll Pod. The Poll Pod does not have the ability to mark an answer as correct. The Poll Pod supports a single question at a time.
How do I see who has their "hand raised?"
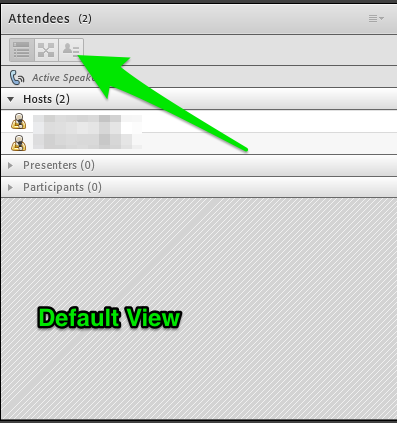
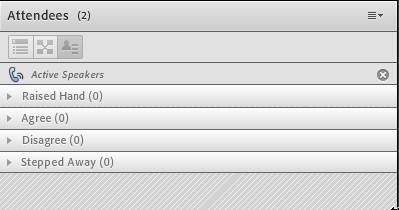
The Attendees pod has two views to help you identify students with questions. In the default view, students with their hands raised will be at the top of the list of participants. In the Attendee Status view, students with their hands raised (or agreed or disagreed to a question you have asked) will be displayed under their appropriate headings.
How do I allow my students to make presentations?
You can make a single participant a presenter by hovering over their name in the Attendee Pod and selecting Make Presenter from the menu that pops up. You may also select multiple participants and promote them to presenter at the same time.
In most cases, unless you want the student to have full control, you don’t want to give students Host privileges as that gives them access to Pods and Layouts.
How can I prepare a lecture (similar to Collaborate Plan)?
You can prepare your room in advance of your class and have your configuration ready for when class starts. Use the Layouts feature (on the right side of the screen) to transition from activity to activity. In your Welcome layout you might have the Chat Pod, a picture of your presenter (share pod), the PPT with title slide (share pod), and your Web cam. When it is time to start presenting, you may choose to create a layout with the Q & A Pod and your presentation. For answering questions, the Chat Pod, Q & A pod, and your Web cam might be best. Each of these sets of pods (and where they are on the screen) is a Layout.
How do I use Break Out Rooms?
The first trick to breakout rooms is to have the correct pods that you want students to use already on the screen before you send them to breakout rooms. Whatever pods are on the screen will be copied into the breakout rooms.
Your students will enter the breakout rooms as Presenter. Presenters can use existing Pods, but cannot hide a pod or bring a new pod onto the screen.
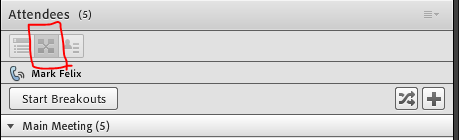
Once you have brought all the correct Pods onto the screen and placed them where you want them, use the “View BReakout Room” icon in the Attendees Pod to bring up the necessary features.
Click Start Breakouts and then use the plus sign to create as many rooms as you want. The icon with 2 arrows can be used to randomize students into rooms. You can click on a student’s name and a menu will display to let you choose which room to send them to. You can also drag and drop student names into rooms.
How do I set the correct pods for each breakout room?
When creating break out rooms, each breakout room contains the same pods that are in the active layout of the main room. If you have particular pods you want available in the break out rooms, create a breakout room layout with the correct pods. When you are ready to go to break out rooms, make that layout active. That layout and its pods will then populate the break out rooms. How do I bring content back from a specific room to the main room? After a breakout session, and after all the students are back in the main room, content generated in a breakout room can be shared with the whole class by going to Pods, selecting break out rooms, select the particular room that contains the content to be shared, select the particular pod that contains the content. It will then be available to all the students in the main room.
How do I get help?
If you need help in managing your room, or learning how to use Adobe Connect, contact your departmental IT or Educational Tech team. For issues connecting to the University of Arizona network, configuring your browser, or updating your computer, contact the 24/7 IT Support Center.
How do I create my first meeting?
Generally, you will enter Adobe Connect through D2L, so this set of instructions assumes that you are starting there: 1. Click Adobe Connect under UA Tool in the D2L navigation bar. 2. Click Add Meeting in the Course Meetings Area, the first Add Meeting button you come across. 3. Give it a name 4. Select the Meeting template. 5. Click Next 6. Click Sync Users at the bottom of the page. 7. Click Finish
Close that browser Tab and return to D2L. Click Adobe Connect Again. There should be a join button. Click Join. It should log you in immediately.
Do I need to do anything for students to meet in study groups?
The only thing that needs to be done is that study groups need to be created in the study group section of the meeting set up page. An instructor can create study rooms for the students or students can create their own rooms. This process requires manually selecting and adding students to each study room.
How do I clear out last week’s material?
- Go to Pods -> Manage Pods and click on the top pod in the list. Hold the shift key down and 2. click the last pod in the list to select all the pods
- Click the Delete button.
- Click Done. This hammers all the pods in all the layouts.
- Click on Layouts
- Select Reset Layouts - this repopulates the pods in the three default layouts with new, empty pods.
How do I create a customized organization for my archived materials?
You can rename a pod (the AC word for a window) by double clicking on the title bar, typing in the new name, hitting enter (example: changing “chat 1” to “Student Chat about Spinal Fluid”)
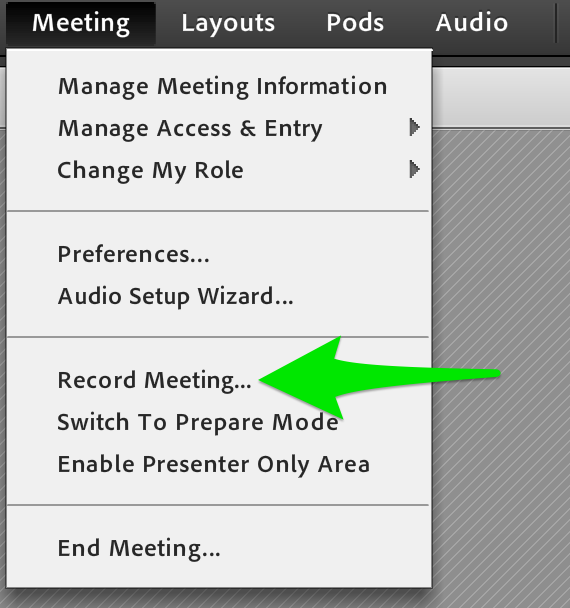
How do I record a meeting?
Select Meeting from the top of your screen and select Record Meeting
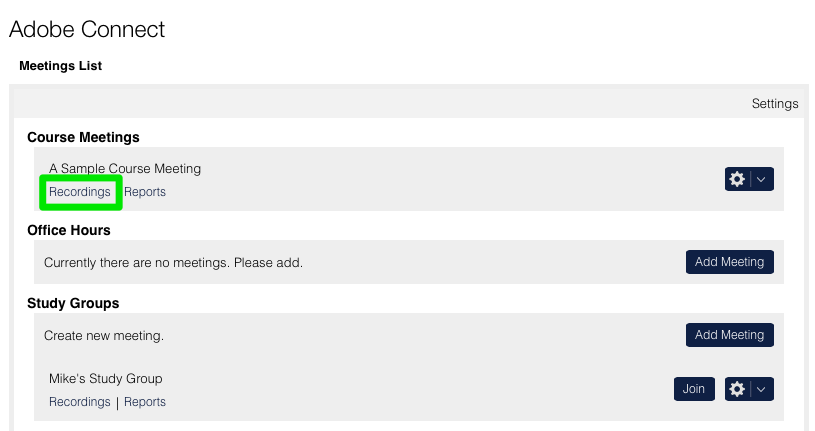
How do I share recording with students or others?
If you are going through D2L to enter the meeting then on the same screen as the “Join” button there is a link to recordings. Each time the class meets and it is recorded the recording is automatically placed in the list.
How do I invite someone who is not at UA to the meeting?
From your Meeting room, select Meeting -> Manage Access & Entry.
You must be sure that you have selected the option to allow guests into the room. If there is no check mark next to Block Guests, then guests are allowed. If you see a check mark next to it, you have blocked guests.
From Manage Access & Entry, select Invite Participants
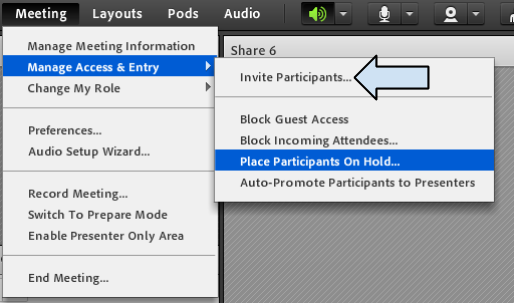
If you click on Invite Participants it will give you the link to your meeting.
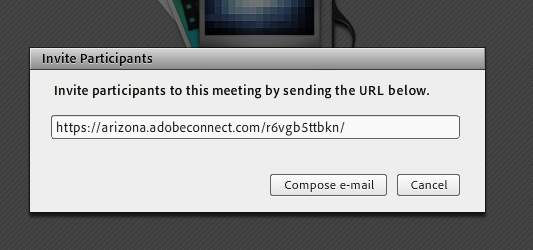
Keep in mind, your normally enrolled participants will appear as an icon with a yellow shirt. Guests will appear as a icon in a blue shirt.
How do students set up a study group in Adobe Connect?
Students can set up their own study groups in Adobe Connect. They log in to D2L and go to the Adobe Connect link you set up for your course. Under Study Groups they can add a meeting by entering a title and selecting the default meeting template.
Important: The student that sets up the study group must add the students in their group to their meeting. Select students in your group from the list on the left and click the Add button.
Are there additional Pods available for Adobe Connect?
You can access various pods/apps (most are free, but some are not) at the following Adobe URL: http://www.adobe.com/products/adobeconnect/apps.html